
How to Make Tofu and Soy Milk from Scratch
Editor’s Note: The following article is an excerpt from Mastering the Art of Plant-Based Cooking, a forthcoming book from Joe Yonan, the James Beard Foundation Award-winning food and dining editor of The Washington Post and the author of Cool Beans and Eat Your Vegetables. Out Sept. 3, 2024, Yonan’s latest book is a comprehensive compendium spanning more than 400 pages, with approachable, high-quality vegan recipes as well as cooking wisdom from around the world. In the following excerpt, from the opening “Building Blocks” chapter, Yonan shows us how to make soy milk and tofu from scratch.
These recipes are more than just related: I don’t think it makes sense to do one without the other. For one thing, the best homemade tofu comes from homemade soy milk—because the latter is fresh, has only two ingredients (soybeans and water), and tastes better than virtually anything you can buy. Second of all, if you’re going to go to the trouble of making your own soy milk, you might as well make a decent-size batch so you can use some of it for drinking and some of it to make tofu.
I used the word “trouble,” but the truth is, none of this is difficult. Making soy milk requires one step further than, say, almond milk, in that after the typical soaking, blending, and straining, you cook the soy milk, in part, to make it more digestible. (Remember that uncooked beans can cause gastric distress.)
And it’s worth it: What you get will be the best soy milk you’ve ever tasted, and you can use it anywhere you would use any plant-based milk: in drinks, over granola, in overnight oats and smoothies—and, of course, to make tofu. Best of all, you don’t have to do this all at once.
After soaking the soybeans, you can refrigerate them for 2 days before doing anything with them. And after you make the soy milk and divide it in half, you can proceed with the tofu immediately, or refrigerate or freeze the soy milk and come back to that when it’s convenient. Just get it back to the required temperature, and you’re good to go.
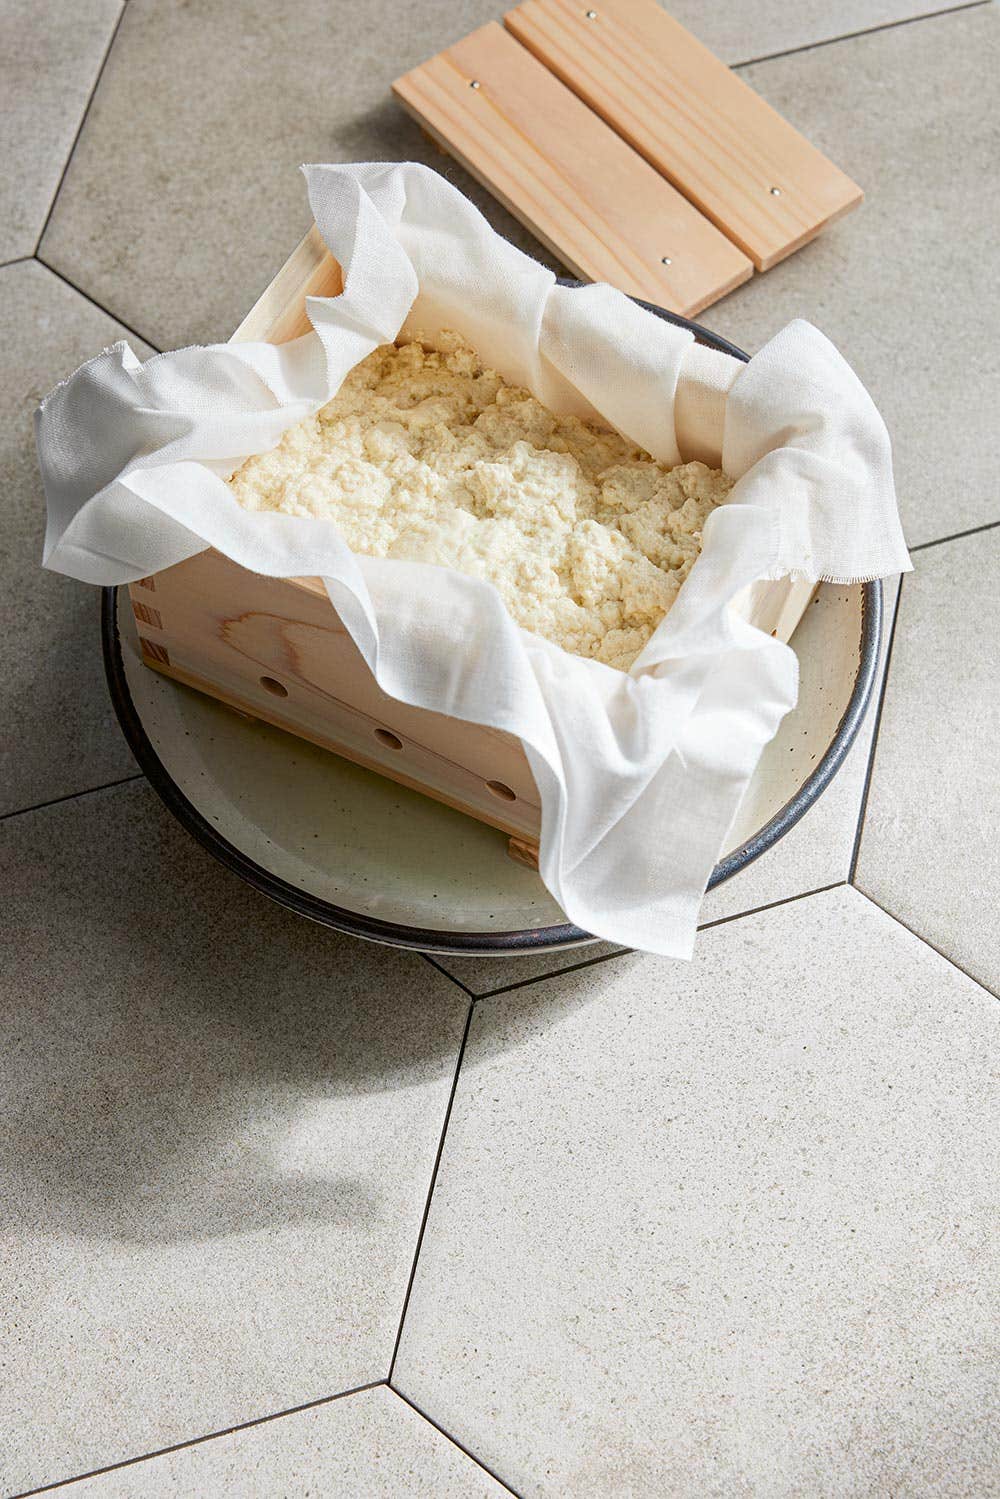
The thing that I hope will strike you the first time you make tofu is this: Why haven’t I done this before? Once you’ve cooked the soy milk, you just cool it down a little, add a coagulant (I prefer the traditional Japanese nigari, which is simply magnesium chloride, but lemon juice and vinegar work, too), wait for the curds to separate, then spoon them into a cheesecloth-lined press, and ... press. I’ve got a Japanese bamboo tofu-pressing box for this, but you can use other setups, even just a cheesecloth-lined fine-mesh sieve.
As is the case with the soy milk, the texture and flavor will be better than any tofu you can buy, because you’ve controlled the ingredients and because nothing is fresher than tofu you make at home. It’s also adaptable: Use more or less coagulant, press for a longer or shorter amount of time, and your tofu will be firmer or softer—but still firm enough for frying, roasting, braising, and stewing, or even for crumbling. I’ve given you a coagulant amount and pressing time that results in a medium-firm tofu.
Equipment Needed
- Nut-milk bag
- Cheesecloth or muslin
- Tofu mold (or fine-mesh sieve and a plate)*
*I love the Japanese cypress tofu mold that I bought as part of a kit from Cultures for Health. The site also sells nigari, nut-milk bags, and other fermentation supplies.
How to Make Soy Milk

This recipe makes 12 cups of soy milk.
Ingredients
- 2½ cups (1 pound/450 grams) non-GMO organic soybeans (I recommend Laura Soybeans)
- 22 cups (5.2L) filtered water
Instructions
- In a large bowl, combine the soybeans with 6 cups (1.4L) filtered water. Cover and soak overnight, 8 to 12 hours. Drain and rinse the soybeans, which will have gone from round to oblong.
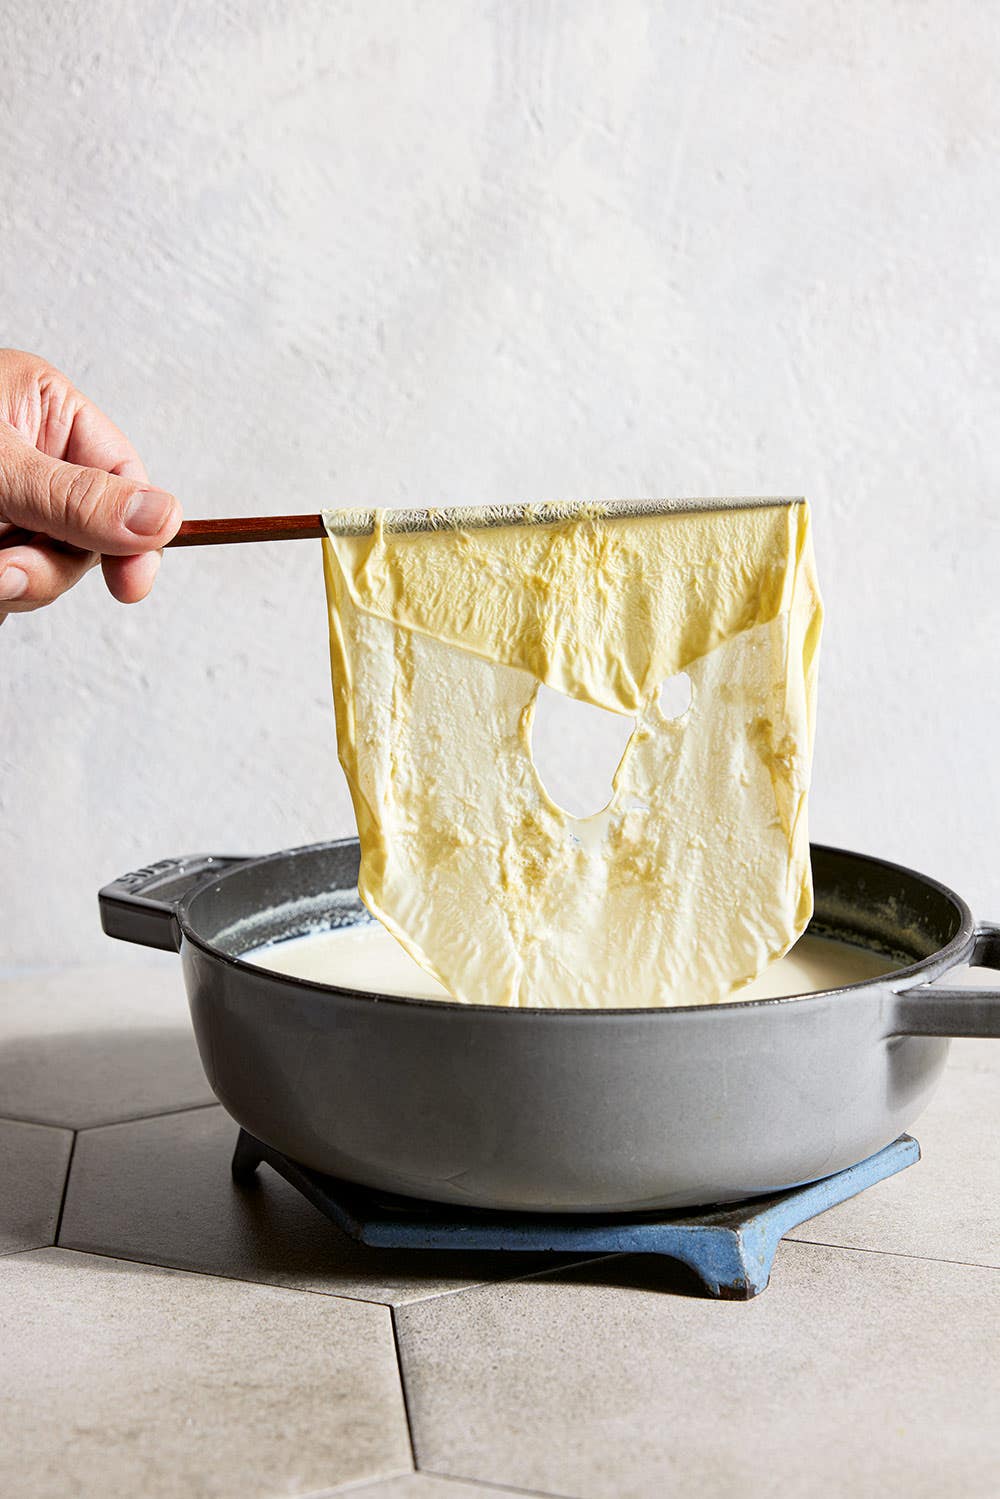
- Transfer about one-quarter of the beans to a blender, add 4 cups (950ml) water, and blend until very smooth, at least 1 minute. Set a nut-milk bag over a Dutch oven or stockpot and pour the mixture into the bag. Close the bag and squeeze it, twisting as needed, until you’ve pressed out as much of the soy milk as possible into the pot. Empty the pulp (okara) into another bowl or storage container. Repeat with another one-quarter of the soybeans and 4 cups (950ml) water, blending and squeezing. Repeat twice more to finish the soybeans.
- Set the pot of soy milk over medium heat and heat to 212°F (100°C), using a silicone spatula to gently stir and scrape the bottom so it doesn’t stick or scorch. This could take as long as 15 or 20 minutes. Adjust the heat as needed, including taking the milk off the heat if it threatens to bubble over. Once the milk reaches 212°F (100°C), reduce the heat to keep the soy milk at a simmer and cook, stirring, for 15 minutes. (This step makes the soy milk digestible.) As you simmer it, skim off any foam and periodically use tongs, chopsticks, or your skimmer to remove the skin (yuba) that forms. (Save this for a cook’s treat, eating it as is or cutting it into strips and pan-frying.)
- If making tofu right away, set aside half of the soy milk (about 6 cups/1.4L) and let cool to between 160° and 175°F (70° and 80°C); if making the tofu later, refrigerate the soy milk. Pour the remaining soy milk into a storage container or containers, let cool for a few minutes, then refrigerate or freeze.
Storage: Refrigerate the soy milk for up to 5 days or freeze for up to 6 months.
How to Make Firm Tofu
This recipe makes 20 ounces (4 to 6 servings) of firm tofu.
Ingredients
- 6 cups (1.4L) soy milk
- 1 cup (240ml) warm filtered water
- 2 teaspoons powdered nigari (magnesium chloride), or 2 tablespoons fresh lemon juice or distilled white vinegar
Instructions
- If you’ve just made the soy milk, cool it to between 160° and 175°F (70° and 80°C). If it’s been refrigerated, heat it to that temperature.
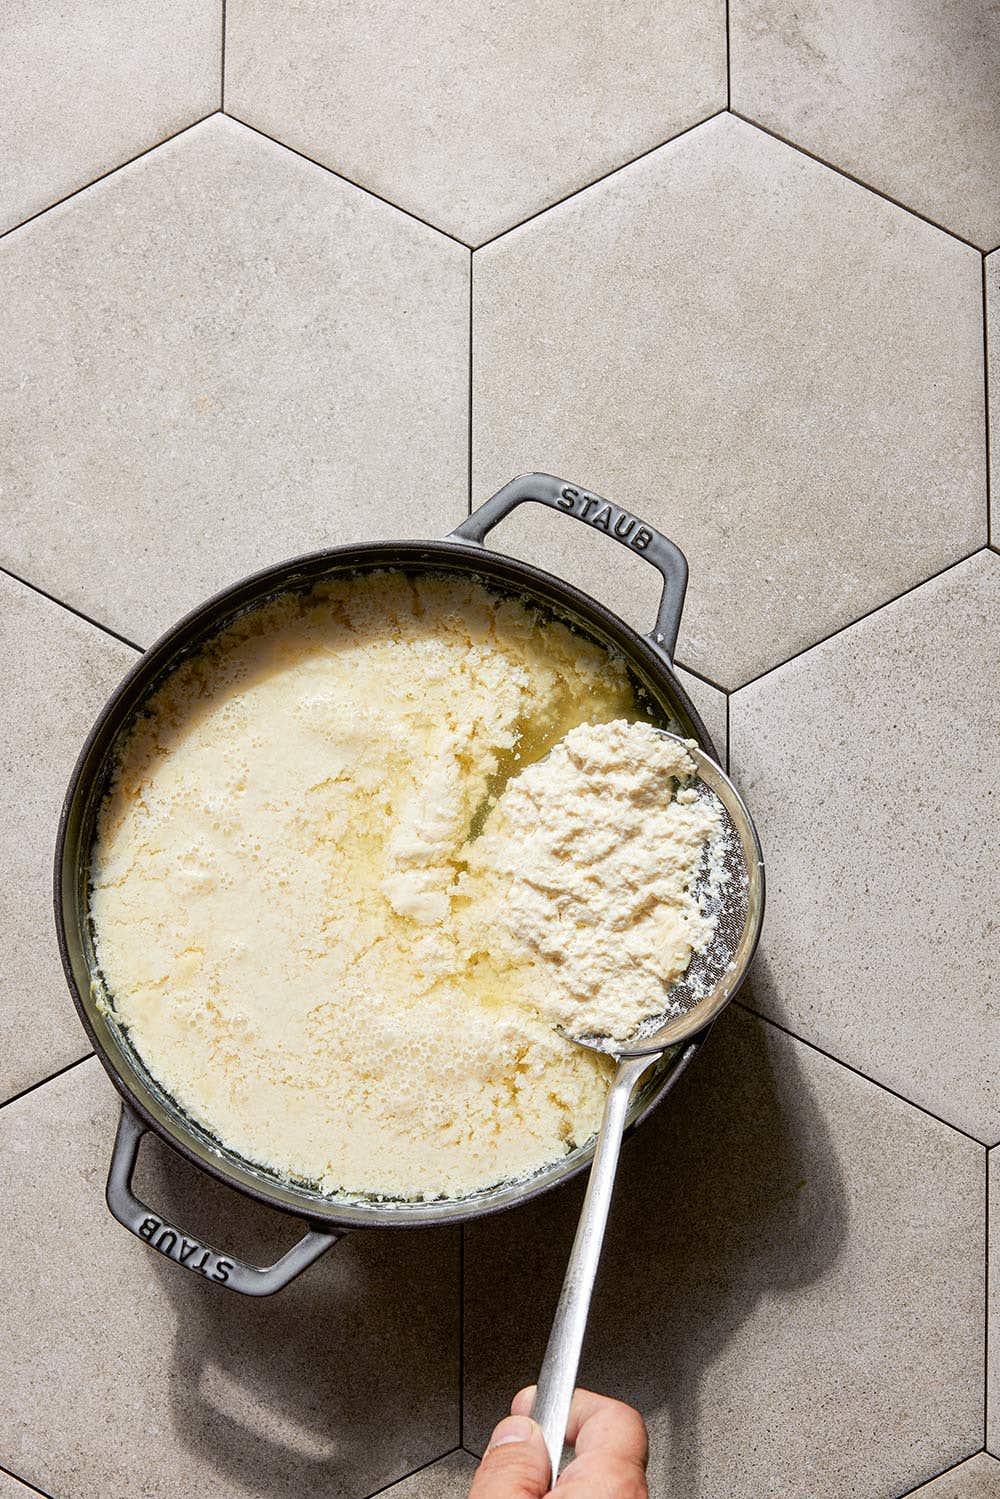
- In a bowl, stir together the warm water and nigari (or lemon juice or vinegar), then immediately pour it into the hot soy milk and gently stir it in. Allow the milk to sit undisturbed until curds form, 5 to 15 minutes.
- Line a tofu press or fine-mesh sieve (or other mold with holes in it) with cheesecloth. Spoon the curds into the tofu press or sieve and set over a bowl. Fold the fabric over the curds and top with the tofu press. (Or top with a small plate and add a large can of tomatoes or beans or other small weight of about 1½ lb.). Let the tofu drain until it holds together, 20 to 30 minutes.
- Transfer the tofu, still in its cheesecloth, to a bowl or storage container filled with cold water. Carefully unwrap the tofu, remove the cloth, let it sit for 30 minutes, then remove and drain. (This removes any remaining bitter or sour flavor from the coagulant.)
Storage: Refrigerate the tofu, submerged in cold water, for up to 5 days, changing the water every day or two, or freeze for up to 6 months. (FYI, freezing will change the texture, in a way that many people, including me, love: It makes it spongier and better able to soak up marinades.
Learn more about Mastering the Art of Plant-Based Cooking and pre-order a copy here.
Reprinted with permission from Mastering the Art of Plant-Based Cooking by Joe Yonan, copyright © 2024. Published by Ten Speed Press, a division of Penguin Random House, LLC. Photographs copyright © Erin Scott

About the Author

About the Author
Joe Yonan
Join our mailing list
Get free recipes and the latest info on living a happy, healthy plant-based lifestyle.
By providing your email address, you consent to receive newsletter emails from Forks Over Knives. We value your privacy and will keep your email address safe. You may unsubscribe from our emails at any time.